
The fraisier is normally found sitting proudly under the counter of French patisserie with its attractive counterparts, tempting shoppers with promise of gourmandise. A fraisier (une fraise = strawberry) consists of two layers of light Genoise sponge, crème mousseline, a thin layer of marzipan and, you guessed it; sweet, red, juicy strawberries. The combination is heavenly – the light sponge perfectly balances the rich buttery filling, which is also offset by the fresh strawberries and slight bitterness of the marzipan top.
The fraisier has been on my baking wish list for a while, but I wanted to wait until strawberries were in season, and I had enough time to do it justice. For me, the enjoyment of baking comes as much from the process of creating as it does from the eating. And this definitely isn’t a last-minute-there’s-a-cake-sale-tomorrow midnight bake. This is a I’m-going-to-set-aside-a-whole-morning-and-indulge-my-inner-perfectionist bake. But even if for you, baking is just a means to an indulgent end, trust me, this bake is worth every minute.
I am a believer that French bakes should be made with French recipes, not an English interpretation. So for such a classic french treat, I turned to France’s answer to Mary Berry, Mercotte. The recipe I used can be found here, which I tweaked slightly to overcome one or two minor translation issues. Enjoy!

Preparation time: 2 hours
INGREDIENTS
Genoise
- 90g plain flour
- 90g sugar
- 150g eggs
Crème mousseline
- 375g milk (I used semi skimmed)
- 80g sugar
- 55g egg yolks
- 15g plain flour
- 15g cornflour
- 1 vanilla pod (or 1tsp good quality vanilla extract)
- 250g softened unsalted butter
- 15g kirsch, or other cherry liqueur (optional)
Syrup
- 50g water
- 60g sugar
- 10g kirsch (or strawberry syrup for a non alcoholic alternative)
300g strawberries (I bought two punnets, as it’s worth it to make sure you have sufficient evenly sized strawberries, and also when have spare strawberries ever been unwelcome?)
Decoration
- 100g marzipan
- A little icing sugar mixed with kirsch for piping writing on the top (optional)
EQUIPMENT
- 20cm loose bottomed cake tin
- Baking tray approx 20 x 40cm (big enough to fit 2 circles the same diameter as your cake tin)
- Acetate to line the cake tin (although I didn’t have any, so I used a DIY alternative of a strong sandwich bag wrapped around foil.)
INSTRUCTIONS
Genoise sponge
Preheat the oven to 170°c
The genoise is made using a Bain-Marie (a bowl over a lightly simmering pan of water. You only need a little water in the pan – don’t let the water touch the base of the bowl). Start by weighing sugar into the bowl and whisk in the eggs slowly until everything is well combined. Put the bowl over the pan of water and beat using electric beaters until it pales and has approximately tripled in volume. The original recipe said this should be when the mixture reaches 45-50ºc, although I didn’t measure this – I just waited until it felt warm to the touch. Take the bowl off the pan of water, and continue to beat until the mixture has cooled down to near room temperature. This should take about 10 minutes.

Carefully fold in the flour a third at a time. The mix will drop a bit, so don’t worry, but all the same take care not to over fold the mixture. Pour the mix into a lightly greased and lined baking tray of about 40 x 20cm. IMPORTANT check you can fit two circles of the size of tin you are using for the fraisier on the baking tray. Smooth the mixture out with a spatula and bake for 10-15 minutes until lightly golden. Cool on a wire rack.

Crème Mousseline.
Start by halving the vanilla pod and placing in a pan along with the milk. Slowly bring the milk to the boil, stirring occasionally. Meanwhile, incorporate the dry ingredients in a reasonably large bowl. Add the yolks and combine well. When the milk has boiled, add the milk very slowly to the egg mixture, beating well all the time. I like to start off adding a tablespoon at a time to start off with, and then when the mixture is thinner you can start to add the milk more quickly. Return the egg-milk mixture to the pan and thicken over a low heat, stirring all the time with a whisk/spatula.
Once thickened remove from the heat. Take half the butter and cream it. Add the thickened custard mixture to this slowly, beating all the time. Pour the custard onto a clean baking tray (with reasonably high sides!). This is to help it cool quicker. Cover with cling film so the film touches the custard so prevent a skin from forming. When it’s cool enough, pop it in the fridge to cool further.

Once completely cold, cream the remaining butter with electric beaters. Slowly beat in the cold custard to the butter and continue until light. Add the kirsch at this stage if you are using it. Cover again and keep cold until you are ready to use it
Syrup
Bring the water and sugar to the boil. Remove from the heat and add the kirsch. Leave to cool.
Assembly
The excitement begins!
Select the most evenly sized strawberries from your punnet(s), cut the base off them and then in half. These will line the edge of the tin. After reserving a few strawberries for decorating the top of the fraisier, the rest will be used for the inside. You can choose whether you want them chopped finely of keep them relatively whole…they won’t be seen from the outside but will when the fraisier is cut.

First, prepare the tin by lining it with acetate/DIY lining, and a circle of grease proof paper/acetate in the bottom.Using the base of the tin as a guide, cut two circles of Genoise. The rest of the Genoise can now be used for that all important quality control taste testing. Generously brush both sides of the sponge circles with the syrup.
Place one circle of Genoise in the base of the tin, pushing down on the edges to make sure it’s well in the bottom. Next, fill a piping bag with the crème mousseline and pipe a small circle of around the edge of the circle, to hold the strawberries. Take the halved strawberries and place them carefully around the edge of the tin, the cut side against the edge. Make sure you pack them tightly. Once you have finished completed the halo of strawberries, fill the middle with a layer of crème. Pipe in between the strawberries too, so you can no longer see the edge of the tin between the strawberries. Fill the middle with the chopped (or whole) strawberries, and top with more crème, there should no be no strawberries visible.
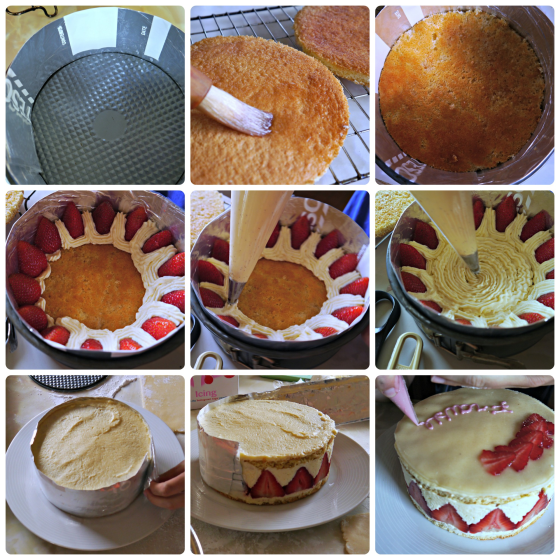
Place the second circle of Genoise on top of this, pressed down lightly, and finally spread a thin layer of crème over the Genoise. Refrigerate for a good half an hour. In the mean time, you can prepare the marzipan and decoration. Roll out the marzipan and cut out a circle in the same dimension as the fraisier. Prepare some strawberries according to your creative preference (I did mine in thin slices) and finally, if you want to pipe any writing on, mix a little icing sugar with kirsch and transfer to an icing bag.
Take the fraisier out the fridge and remove the tin. Now for the part you have been waiting for – slowly peel back the acetate and marvel at your work! Carefully lay the marzipan over the top and decorate how you would like.

Keep cold until you serve it…and make sure you invite some people round to appreciate all your hard work! As delicious as a fraisier is, I think it would certainly be an achievement to eat one by yourself!


Another brilliant recipe Rosanna! I also agree, surplus strawberries have rarely been unwelcome!!
This looks so good
Love the French handwriting on top!